Page Accessibility
Text and HTML content should be designed to be accessed by screen readers and easily navigable by keyboard only. The most important considerations when building pages in MyUni are:
- page structure
- font and heading use, and
- colour choice.
This guide will outline best practice approaches to creating Accessible page content in MyUni.
Considerations
The MyUni platform (Canvas) meets most Accessibility requirements through the use of standard tools. Often, issues arise when content is created outside of the Rich Content Editor environment and special considerations need to be made when doing so.
It should also be noted that not all standard tools in the Rich Content Editor provide accessible content by default, and settings should be checked when adding images and tables.
Page structure
Headings help to identify the hierarchical structure of a document (e.g. sections, sub-sections). They provide a visual cue that helps sighted readers quickly navigate through sections of a document, skimming until they find the section they are looking for. Similarly, headings create logical divisions in the content and allow non-sighted learners to navigate a page or document easily using a screen reader.
Avoid toggle down content and tabs
It's also important to avoid adding erroneous navigable elements such as toggle down content, or tabs. This adds additional load to non-sighted learners and can lead to learners becoming disoriented in the content. Hiding key content within these elements can also lead to learners without an impairment missing out on information. However, in certain circumstances where you need to temporarily hide content from students, toggle down content or tabs would be a good use of the CIDILabs tools available in MyUni.
Typeface and heading selection
When selecting a typeface, it is important to stick to the predetermined HTML allocated fonts within the platform. By keeping to this hierarchy, it allows screen readers to correctly read the content on the screen, in the correct order.
Within MyUni, the page title on each page displays a h1, which means that no other text within the page should use the h1 tag to display. The following type hierarchy should be used when constructing page content:
- subsection headings should be written as
h2 - subsections of subsections as
h3 - subsections of subsections of subsections as
h4 - all text content must be displayed within
ptags, and - any code snippets display within
pre(formatted)tags.
If the HTML editor is being used during page build, this will need to be typed out manually, otherwise the typeface Drop Down menu within the Rich Content Editor should be used.
Typeface size
There are two main concerns when working with typeface sizes:
- ensuring that default font sizes are not too small (default is 1rem or 16px), and
- ensuring that text can be expanded to 200% on all pages.
Keep in mind these recommendations and guidelines:
- 16px or 1rem for body text. For most documents, body text should be around 16px. Small fonts may be illegible for some audiences
- 12px or 0.7rem for footnotes. If a document contains footnotes or endnotes, the minimum size should be 12px, and
- The Web Content Accessibility Guidelines (WCAG 2.0) recommend ensuring that text can be zoomed to 200%.
Due to the requirement for page zooming, it is recommended that this feature is tested during page build to ensure text size increases correctly.
In addition to page zoom, the Microsoft Immersive Reader tool is available on all pages. This tool requires appropriately structured text content as stated above to provide content to a student using the tool.
Colour and contrast
Colour choice, and in particular contrast, play an important role in accessibility. Lack of contrast between foreground and background elements can make content unreadable to some learners. If you are presenting text or image-based content on a coloured or textured background, it is important to confirm that there is sufficient contrast between the chosen foreground and background colours. You can do this by using a contrast checker.
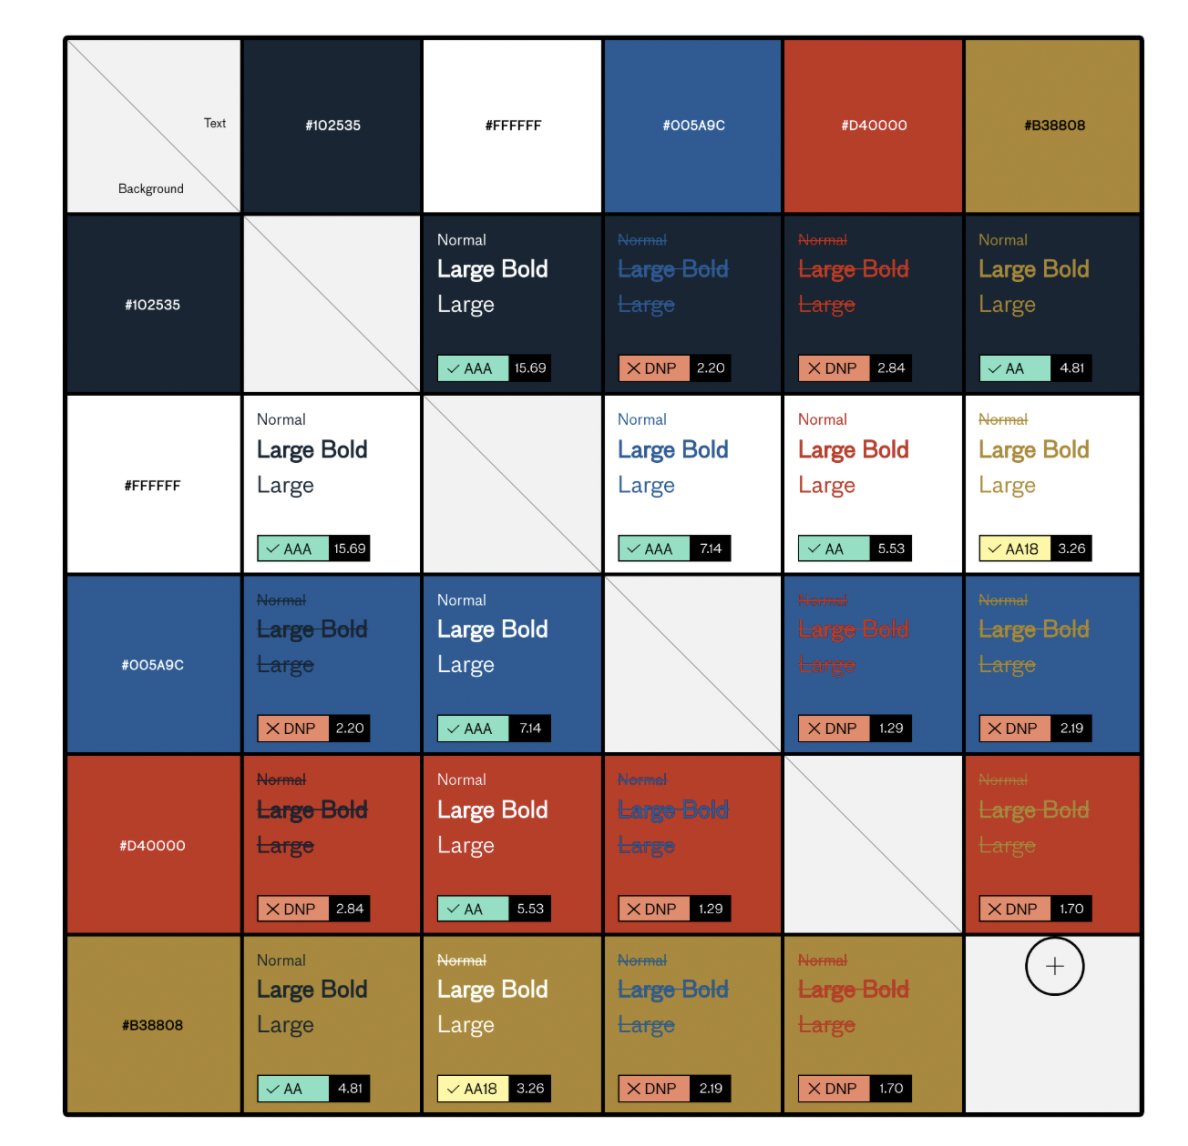
Web Content Accessibility Guidelines (WCAG 2.0 AA) suggest a:
- 4.5:1 contrast between the link text colour and the background, and
- 3:1 contrast between the link text colour and the surrounding non-link text colour.
The MyUni default link colours are recommended throughout the course build as they will meet these guidelines.
Use of colour
If you have used colour to convey information in either text or graphic form, ensure that you have not used colour alone and provide supporting text.
Links
When creating links or hyperlinks on the page, it is important to ensure they function correctly and are accessible by all learners.
All links must have text that describes the topic or purpose of that link as screen readers may read out all of the text for that link. Avoid using “click here” or “read more” without the added context of the link's purpose. Take a closer look at the following examples of links where accessibility has not been addressed - as well as the correct way to write a link.
| Type of link | Recommendation | Explanation |
|---|---|---|
| Example 1: Click here for more information about the University of Adelaide. | Not recommended | The linked words do not provide a clear description of what the link is. While 'information about the University of Adelaide' fills in some of the details, the screen reader will read out the 'click here' part of the sentence, making the experience for those who are relying on the screen reader less than ideal. |
| Example 2: You can find more information about the University of Adelaide at http://www.adelaide.edu.au. | Not recommended | The screen reader will read out the URL letter by letter, which is problematic in terms of the experience. |
| Example 3: The Study at Adelaide website has more details about how you can study at the university. The page identifies options for undergraduate students, postgraduate students and international students, and has information about scholarships, entry pathways and how to make enquiries. | Recommended | The linked words do not provide a clear description of what the link is. While 'information about the University of Adelaide' fills in some of the details, the screen reader will read out the 'click here' part of the sentence, making the experience for those who are relying on the screen reader less than ideal. |
Open link in a new tab
Best practice for linking to a website (or web page) that is outside of the course is for that site or page to open in a new window or tab.
The only way to do this within MyUni is to edit the HTML code manually. To add a link and change its target:
- Click on the ‘Link to Website URL’ icon from the Rich Content Editor
- Add your link to the ‘Paste or type a url or wiki page in the box below:’
- Click on ‘Insert Link’
- Click HTML Editor above the Rich Content Editor WYSIWYG window
- Locate the link within your HTML code, look for the
<a>tags which include your link as ahref=”...”code - Within the
<a>tags, addtarget=”_blank” - Click Save on your page.
Linking to internal content
When linking to internal content within MyUni, either course pages or files, the default way links are added into each page is sufficient to meet accessibility guidelines.
Linking to files
When linking to a non-HTML page element, it is important to include the file type details for that link. These links should be considered to play the ‘button’ role for ARIA purposes. Examples of file types include:
-
Microsoft Word
-
Microsoft Excel
-
PDF
-
TXT files, and
-
media files.
-
The University of Adelaide Behaviour and Conduct Policy [PDF].
-
Welcome to AnalyticsX transcript [TXT].
Tables
Table structure - simple vs complex
Tables should only be used to display data, not for layout or displaying content. A simple table structure consists of one header row and/or one header column. Tables classed as complex tables may consist of more than one header row or column and possibly merged or split cells.
It is important to keep tables as simple as possible in their structure. This is because screen readers move left to right and top to bottom, one cell at a time - meaning that any merged or split cells may be missed by the screen reader.
In the same way that our text content must be structured by font tags (h3, p, etc), tables also require structure. This means that it is important to add table header rows and header columns to define the different sections of information.
Simple tables
A simple table should include:
- a title or caption
- a scope parameter to help assistive technology navigate the structure, and
- enough cellpadding for readability.
A simple table should not include:
- more than a single header row and/or column, or
- any merged or split cells.
Rows and columns that are to be defined as header rows or columns use the th tag rather than td or tr. Simply using bold or font colours is not enough to define a table header row or column. However, styling can be applied using CSS.
The scope attribute defines a way to associate header cells and data cells in a table. The scope attribute identifies whether a cell is a header for a column, row, or group of columns or rows.
HTML Example
    <table style="border-collapse: collapse; width: 100%;" cellpadding="10">
    <caption>Spring Blossoms</caption>
        <tbody>
            <tr>
                <th style="width: 25%;" scope="col">Colour Family</th>
                <th style="width: 25%;" scope="col">Bulbs</th>
                <th style="width: 25%;" scope="col">Shrubs</th>
                <th style="width: 25%;" scope="col">Trees</th>
            </tr>
            <tr>
                <th style="width: 25%;" scope="row">Pink</th>
                <td style="width: 25%;">Tulips</td>
                <td style="width: 25%;">Flowering currant</td>
                <td style="width: 25%;">Ornamental plum</td>
            </tr>
            <tr>
                <th style="width: 25%;" scope="row">Yellow</th>
                <td style="width: 25%;">Daffodils</td>
                <td style="width: 25%;">Forsythia</td>
                <td style="width: 25%;">Star magnolia</td>
            </tr>
        </tbody>
    </table>